

Templates Guide
Learn how to create custom dynamic messages.
Creating Custom Notifications
Pingo Notify turns WordPress, WooCommerce, and many other plugin events into custom automated notifications.
1. Notification Setup
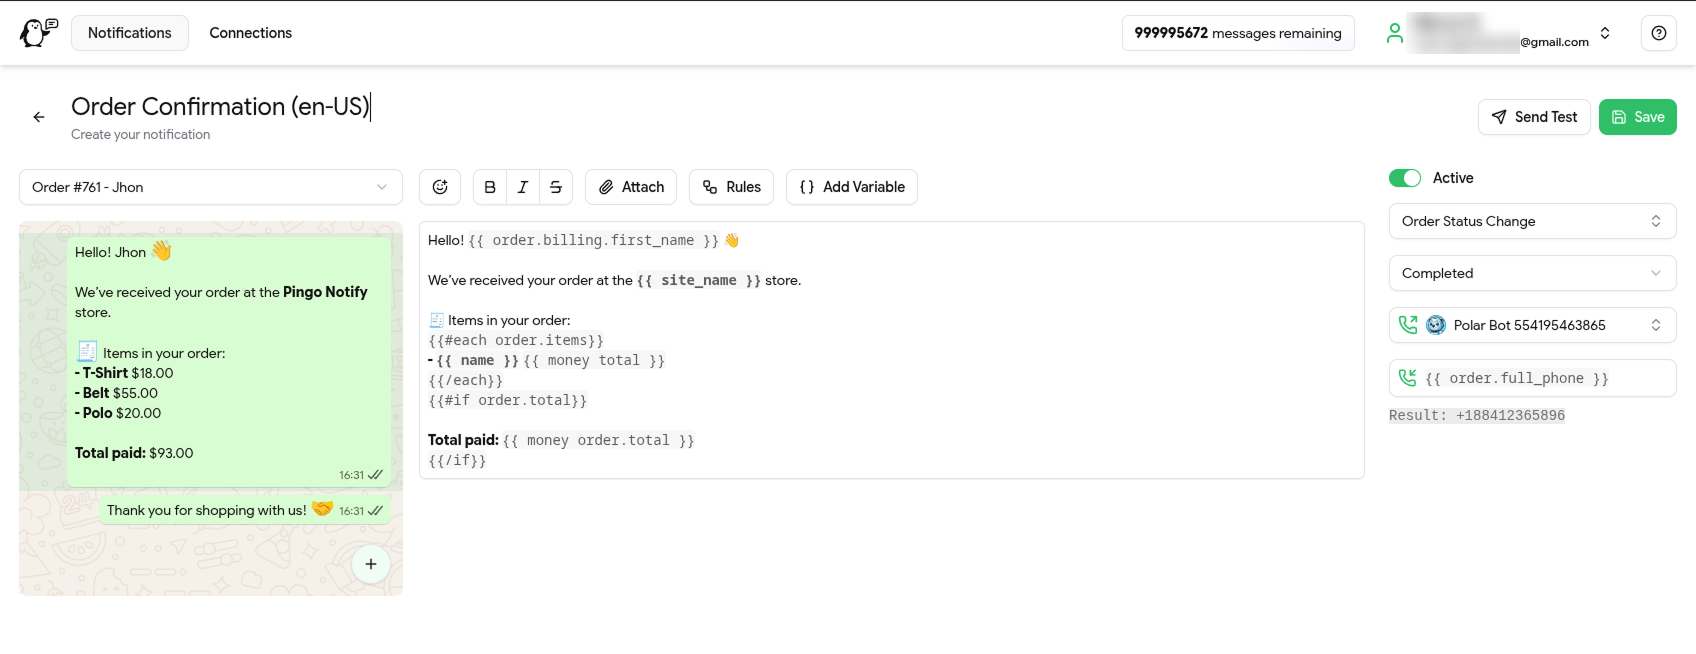
Before writing the message, define the following in the sidebar:
Trigger and Destination
- Trigger: The event that triggers the notification. See some examples:
- Order Status Change: When a WooCommerce order changes status. This Trigger requires choosing a specific status or the "Any Status" option.
- New Order: When a new WooCommerce order is created.
- New Comment: When a new comment is posted on the site.
- Post Published: When a new post is published.
- Connection: Which WhatsApp connection/number will send this notification.
- Recipient: Who receives the message:
- Dynamic variables (e.g.,
{{ order.shipping.phone }}). - Fixed numbers (e.g.,
15551234567). - Multiple numbers separated by commas (e.g.,
{{ order.shipping.phone }}, 15551234567).
Recommendation: Use
{{ order.full_phone }}. This variable ensures the number includes the country code, unlike{{ order.billing.phone }}which uses the field exactly as filled by the user.Number Format: Always use the full international format (Country Code + Area Code + Number), only numbers and no symbols. The
+sign at the beginning is optional (e.g.,15551234567or+15551234567). - Dynamic variables (e.g.,
Adding and Editing Messages (Preview) You can configure a sequence of messages for the same event. Interact directly with the Preview:
- Add Message: Click the floating + button to add a new message bubble to the sequence.
- Edit Content: Click directly on any message bubble in the preview to select it and edit its text in the left panel.
Rules (Conditional Logic)
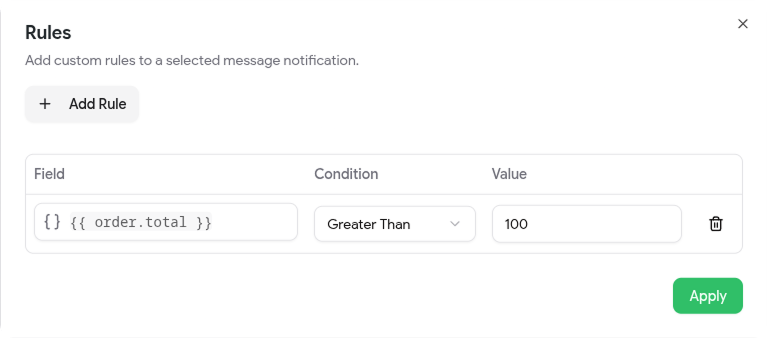
Rules allow you to add intelligence to your notification sends, defining specific criteria for a message to be triggered.
Applies per Message Rules are applied individually to each generated message. This means you can filter sends based on specific data from that event (e.g., order total, payment status, delivery city, etc.).
- Practical Example: Imagine a rule to send only if
order.totalis greater than $100.- If an order of $50 comes in, sending this message (where the rule was applied) will be ignored.
- If an order of $150 comes in, the send is performed.
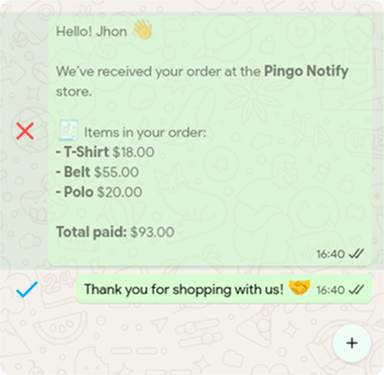
Validating the Rule (Visual Simulation) To ensure your logic is correct, use the Preview in the editor:
- Switch the Example Data (top left) to different orders.
- Observe the preview behavior:
- 🖼️ Fully Visible: Rule True (the message would be sent).
- 👻 Low Opacity (Transparent): Rule False (sending would be ignored).
2. Message Editor
Example Data
In the top left corner, select a real order (e.g., "Order #761"). This will activate Autocomplete and show real data in tests.
Toolbar
- Attach: Send images, PDFs, or audio along with the text.
- Send Test: Use the Send Test button to send the message to your personal number before activating (
Active).
Variables
Variables are the placeholders that will be replaced by the customer's or order's real data at the time of sending.
How to use
Every variable must be inside double curly braces {{ }}.
Hello {{ order.billing.first_name }}, we received your order!
To access data inside other objects (like address details inside the order), we use the dot ..
Your order will be sent to: {{ order.shipping.city }} - {{ order.shipping.state }}
Rules for Variables
When writing variables manually, pay attention to what is allowed:
Valid
{{ order.id }}(Dot to navigate objects){{ customer_name }}(Underscores are accepted){{ total }}(Simple and lowercase names)
Invalid
{{ order id }}(Do not use spaces){{ Order.ID }}(Avoid uppercase letters, prefer lowercase){{ $valor-total }}(Avoid special characters or hyphens at the beginning)
Control Logic (If, Else, Each)
Make your messages "smart". With control logic, the template itself decides what information to show (or hide) depending on the situation of each order.
1. Conditionals (if / else)
The if block works like a question the system asks the data before sending the message.
Example: Check if information exists
Imagine you want to send the tracking code, but not all orders have one yet.
If we use if, the system asks: "Is there a tracking code filled in?"
- Yes: It shows the code.
- No: It ignores it and shows nothing (avoiding sending a blank space).
Your order has been shipped! 🚚
{{ #if order.tracking_code }}
Tracking code: {{ order.tracking_code }}
{{ /if }}
Example: Compare Values ("Is equal to...") You might want to change the text depending on the payment method. Here, the system asks: "Is the payment method equal to 'credit-card'?"
Thanks for your purchase!

{{ #if order.payment_method "credit-card" }}
ℹ️ Your credit card payment was confirmed instantly.
{{ else }}
🕒 We are processing the validation of your payment.
{{ /if }}
Note that we use else to provide an alternative if the answer is "No".
Example: Negative Comparison ("Is different from...") Sometimes, we want to know if something did NOT happen. In the example below, we check if the order is different from cancelled.
{{ #if order.status "!=" "cancelled" }}
✅ Your order remains active!
{{ /if }}
2. Item Lists (each)
Your customer bought 5 different products. You're not going to write the code 5 times, right?
The each block serves to repeat a piece of the template for each item found in the order list.
Order Summary #{{ order.id }}:

{{ #each order.items }}
📦 {{ name }}
   Qty: {{ quantity }} x ${{ price }}
{{ /each }}

Total: ${{ order.total }}
How the context "magic" works:
Notice that inside the {{ #each order.items }} block we just write {{ name }} and not {{ order.items.name }}.
This happens because, inside the loop, the system "focuses" only on the current item. It already knows we are talking about the details of that specific product.
Special Formatters
Raw computer data usually comes without formatting (e.g., 1250.00). To transform them into something human-readable, we use formatters.
Observe the use of the word money before the price variable. This tells the system: "Format this number as money".
Total value: {{ money order.total }}
Result: $1,250.00
Complete Example
Completed Order template with variables, item loop and installment conditional.
Hello {{ order.billing.first_name }}! How are you?

Your order #{{ order.id }} has been completed!
Purchase summary:
{{ #each order.items }}
• {{ name }}  {{ quantity }}x {{ money total }}
{{ /each }}

Payment method: {{ order.payment_method_title }}
Shipping method: {{ order.shipping_method_title }}

{{ #if order.payment_method_id "credit-card" }}
Your credit card payment was received successfully!
{{ /if }}

Total: {{ money order.total }}
Team {{ store.name }}